Thursday, June 7, 2018

City of Jerusalem: Level I materials and a Level II material for the older children


Level I City of Jerusalem 

(Color coded for the 3-6 year olds)

 This is the new Level I City of Jerusalem that we now have in our atrium.  The last Level I trainer we had, Kim Manville Sisson, taught the catechists how to build this material.   What makes this nice for Level I is that each building on the bottom is painted the same color and
same shape as its position on the map so the children know where to place it.  It is also the making it fun and easy for them.  However, overall it was colorless like oatmeal, so I gave it visual appeal and painted very lightly the whole landscape with rivers and paths.  It's very pretty now, I think.  I glued the tomb to the city's corner as the children didn't seem to know what to do with it.  When we present this work we present the path that Jesus took after leaving the Last Supper until he was crucified.  So it starts at the Cenacle, then the Garden of Olives, Caiaphas' Palace, to Pilate in the Tower of Antonia, to Herod and back to Pilate, and finally Golgotha. There is a control book for the catechist. 

I also painted the buildings and gave them gold accents.  We remade the Tower of Antonia using a Drummel as this was missing from the material.  Pictured below is how we show the children to put the work away in the box so they don't damage the materials.  They take pride in that work also.

I have made a control chart  on the top and inside lid of the box below which assists the children and the catechist.  Also, there is a booklet inside which tells the story of the Passion and is color coded.


Level II City of Jerusalem

  I also decided to paint the Level II City of Jerusalem which I had made from children's building blocks, a jig saw and drummel.  Everything is earth colors except for the Temple  as that was actually white with gold trim.

The Level II (7-9 year olds) can read from a booklet following the path Jesus took from the Last Supper to His crucifixion.  The children are told that they can put the walls of the city on the map after they follow Jesus' path.  Some children work in pairs and some just like doing it alone.


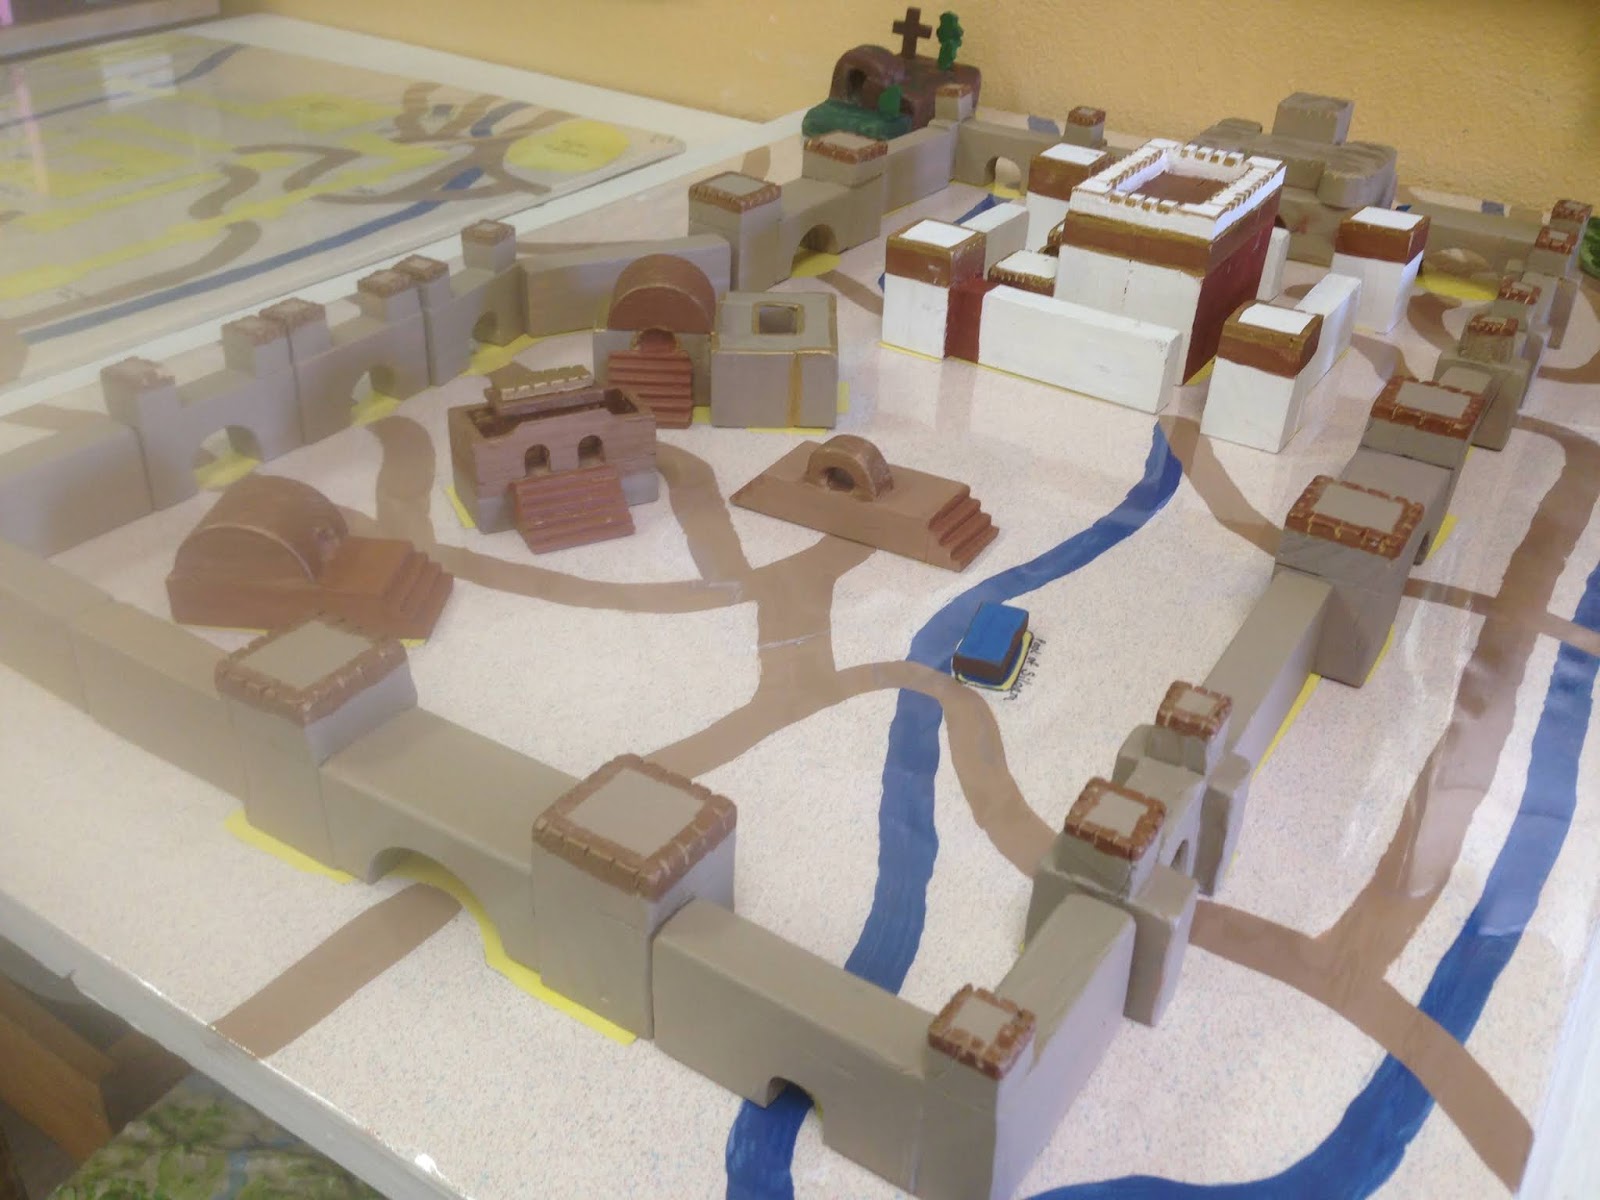
 There are two large maps with the shapes of the buildings and the walls cut out in yellow poster board which then are glued to the map.  The children place each of the buildings on the map and the next child removes the buildings to the  map on the table next to it.  There are two tables side by side.  The last person puts it back in the box as seen below. 

The pieces aren't to be thrown in the box carelessly.  They are put in like puzzle pieces neatly.
This is demonstrated after the presentation.


The Liturgy of the Eucharist and the Nativity Narratives with maps


On these shelves are the Liturgy of the Eucharist.  We begin by showing how the cruets are prepared with the water and wine.  I tell my Level II children that this prepares them if they want to be altar servers.  They are eligible once they have received their First Communion.  They learn all the gestures of the priest such as the "washing of hands," the "Doxology," and the "Epiclesis."  The 7 to 9 year olds can read and are expected to read the words of the priest as they imitate the gestures.  In the "washing of hands" they can work together with one child being the priest and the other acting as the altar server.
Finally, they learn how to do the "Preparation of the Chalice."  And again, the words must be read.  I love hearing their voices across the room reading softly these words.  They take it very seriously, as they should.

Later, we do the entire Liturgy of the Eucharist with a presentation called the Synthesis of the Mass which I will describe at a later time.

 
This bookshelf holds all the Nativity Narratives.  There is a Scripture booklet for each material.  This is so the children can read the Bible Story as they work with the material.  In Level II the children often can be seen reading to each other the Scripture passage while one moves the materials, the other reads.


These are the Tracing packets that go with each of the Nativity Narratives.  The children like to trace and make their own booklets and color them.  The large packets are for the  younger children in Level I and the small packets are for the older children.  However, they sometimes use either.


There is also a geography area in the atrium.  There are small wooden puzzle maps of Israel in Jesus time.  


There is also a Topographical map (left) which helps the children learn where the angel appeared to Mary in Nazareth; where Jesus was born in Bethlehem and where He died in Jerusalem.

The Atrium at St. Andrew the Apostle Catholic Church in Sierra Vista, Arizona

The Atrium at St. Andrew the Apostle Catholic Church

 This is a replica of our altar at St. Andrews.  The little white cabinet contains all the materials that the priest uses at Mass in miniature.  They are labeled with pictures and words so that even the three year olds can put them away when they are finished.  The children learn how to dress the altar and learn the names of the materials used in the Mass.  Children are like little sponges and they remember even the most complicated words like tabernacle, ciborium, crucifix, etc.  It's pretty amazing what they are capable of at such a young age. 


Below the plastic cabinet contains the vestments of the priest that he wears in the Mass.  On display is a chasuble in red which he wears for Pentecost.  The children learn what the colors signify and are able to name the vestments. We use songs which help them remember the feasts and colors in the Church Liturgical Calendar.
In the shelving on the right is art work for tracing and pasting that the children love to do making the vestments and tracing the symbols for the mass and the sacrament of Baptism.  As some of the children who come to this program have not yet been baptized,  it is important that they understand the sacrament they will be receiving and it's significance.

  With all the symbols of baptism along with the oils, we also show the children how to baptize each other using their fists to represent the small head of a baby, which they enjoy doing.  They take turns doing this and are very serious about it.  There are two presentations in the Level I (ages 3-6) and another more detailed presentation for the Level II (ages 7-9).

There is a candle ceremony during the Baptism presentation where each child receives the light of Christ after being blessed with each oil, the Oil of Catechumen (for goodness) and the Oil of Chrism (for courage).  We use the Paschal candle to light their candle as the Paschal candle is used next to the Baptismal Font in the church.  At Easter they learn the meaning of the symbols on the Paschal Candle and there is another candlelight ceremony during Easter as well.  The photo shows art work for the Paschal Candle as well as for Baptism.


The photo on the right is our prayer table.  There is a procession celebration to change the colors for the Liturgical year which the children love to do in Level I.  They sing a psalm while they process outside and come back to the room to redress the prayer table.  

In Level II, the children are introduced to the Bible in its entirety.  At left you see the outside of the cabinet which houses all the books of the Bible.  I usually do a short synopsis of each book and the book's purpose for the Jewish people in the Old Testament.  I might include a short story from different books to make it more interesting until I finish the New Testament.

There are large floor puzzles that the children use to name each book of the Bible and we use songs as well.  The floor puzzle is kept under the prayer table and you can see in the photo a basket under the Holy Bible cabinet where another smaller version is kept.  Each puzzle has a control chart with all the answers.  I usually give a prize if they complete this work.  It takes most of the hour to do.  The religious medals, 

 pins, key rings and holy cards are donated by  parishioners.  I asked one of the office staff if they could help me with this, and I am pleasantly surprised every year and always have enough to last the year.

Each book of the Bible is numbered and the name of the book is on the front.  After asking the children if they notice any differences in the books, they always notice first the sizes.  I tell them that the tall books mean that these are longer stories and the smaller books are shorter.
 This cabinet (left) represents the Cenacle (or Upper Room as it is more commonly known).  It has door on the left side and there is a drawer under it containing the twelve apostles and Jesus made from Sculpy clay.   I make all our figures from Sculpy.  I've seen a figure bounce twice on the hard floor and never break.  It's a tough material after being baked.


My husband has made all the cabinetry for the atrium as well as the little houses for the Nativity narratives, while I do the small sculptures, wood finishing and painting.
You might have noticed that the backdrop of the Cenacle is the Jewish Candelabra for Passover, called the Menorah, I believe.  That can be turned around and on the other side there is the same altar background that we have in our church and on the little model altar.  This is used when we do the "Origin of the Eucharist" to explain the history of when priests and bishops began their work in the Catholic Church and mass until today.   There are ancient papers as far back as 100 A.D. describing the mass in great detail just as it is today.

In Level II, we prepare the children for Reconciliation (Confession) and Holy Eucharist (their First Holy Communion).   Although we read the Ten Commandments in the Bible together and discuss them at their level, our Level II program uses the Maxims (Jesus' own words in the Bible) to discuss sin and what it is.  For example, "Do to others as you would have them do to you."  That leads into a lot of discussion with 7-9 year olds.  They have amazing questions and input which always surprises me.  The white cabinet above contains twelve of the Maxims and the Greatest of all Commandments is on the left, "Love your God with all your heart, with all your soul, with all your mind, with all your strength and love your neighbor as yourself."  By the time we are finished discussing all these wonderful Maxims, they are ready for the Sacrament and understand what Reconciliation is all about.