Tuesday, November 29, 2011

City of Jerusalem - Twelve Gates to the City

Today I thought I'd give an overview of the City of Jerusalem.  I took plenty of photos during the training in Gilbert and I will display those photos as well as the three maps I put together.   One is a control map and the other two are mute (without labels).  It's nice to have it this way because when you are demonstrating how to use it, you take the buildings from the mute map on the left and place them on the mute map to the right.  The children can leave it out when finished so that the next child can move it back again to the left.
 To do the City, I bought children's building blocks from Sears.  I thought the finish and color was pretty and light.  I used a jig saw to cut some of these small blocks in half and then glued them to others with wood glue.  I learned that you have to go very very slowly while cutting in half, otherwise the wood goes out of control and can be dangerous.  My husband bought me a little Drummel drill with different bits.  It's small and fun to use - a real ladies' tool.  Dentists use it as well, so you know it is used for tedious small areas.  I used the Drummel drill to make groves on top of the castle and walls to look like the parapets in the photographs I found.  The Drummel helped to make windows, stairs. and the opening of the tomb also.  I Googled the City of Jerusalem and discovered that there are photographs of a miniature city in Jerusalem showing what it looked like in Jesus' time.  I was amazed how beautiful, lavish, and white it was with golden trim.

I used foam board which I bought at the dollar store and Staples for the map.  I also got the yellow poster paper from Staples to trace the buildings for the map.  I then cut out the shapes from the poster paper and glued them on to the foam board.  I did the roads and waterways first.   I would suggest using a paintbrush and paint to make the roads on the foam board.  I used felt tip for the blue waterway and was sorry later because it didn't stand out as brightly as the paint.

Researching photos online of Jerusalem were very helpful to me.  I did a lot of research as well about the pools and the ancient staircase leading from the lower city to the upper city.  I made a book on this information which has been very useful in my understanding and so I found I could explain things much more interestingly to the children.  So I strongly suggest you do a lot of reading when doing this work.  That's the joy of this work, you learn as you prepare the materials to teach.

   
     I bought heavy plastic at Walmart to cover the maps to protect them from damage.  I taped them tight on the other side.  They've held up well over the years without any fingerprints.


This is St. Patrick's  City of Jerusalem in Tucson.  As you can see from the three different versions of the City, there are subtle differences.  For example, St. Anne's uses poster board paper as does St. Patrick's for the maps.  I used foam board.  I like the fact that you can lift it up with some of the pieces intact in case you have to move it around the room.  St. Anne's City is smaller than mine and St. Patrick's is larger.

St. Anne's uses two small desks.  St. Patrick's uses a larger table for display and I used a table the size of the foam board and made a smaller table to fit underneath for when we weren't using the City.
I bought the squared legs from Lowe's and Home Depot and had them cut to the height I wanted.


(At right  St. Anne's City of Jerusalem)
    Finally, below I am attaching a closeup so you can see ours at St. Andrews in detail.  For the tomb, I glued four blocks together.  One was a half circle.  With the Drummel, I drilled a hole in the front and made the surface very uneven to create a hilly look.   I wanted very little color and only painted the pools, blue; the top of Herod's Palace, gold along with the golden doors; and the trees, green.  My husband did the trees and the stair steps for me.  I've never been able to gain that much control with the Drummel.  I suppose if it had been left up to me to do them, I would have resorted to the Sculpy Clay for the trees, and left the stairs straight and drawn lines.  The children really enjoy this work.

Friday, November 25, 2011

The Cenacle or Upper Room

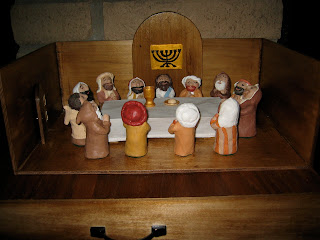
The Last Supper at the Cenacle

As I stated previously in my first posting, the most important tools to have are "liquid nails" and a friendly hardware store where they sell small pieces of wood or have personnel who will cut the wood you buy at their store to fit your specifications.

This Cenacle was made by my husband.  If you have one of those handy types, then you are very blessed as I am.  If you don't, you can find a drawer like the one pictured below.  This can be found at a used or antique furniture store.  I stained ours and painted the menorah, a Jewish candelabra, to represent Passover, the Jewish feast that was celebrated there.  I painted with a varnish over the entire piece.  The wooden floor and three walls with a door are a separate piece from the drawer.  It is smaller in length and width than the drawer.  (I need to point out that I designed it this way so I could move the figures around it and behind it when Jesus and the Apostles leave to pray in the Garden.  This separate room can be made with the liquid nails as described in my first posting.)  The arch with the menorah can be slid off and reversed.  This reversed side is used in Level II for the Origin of the Eucharist.  It consists of two small arch shapes with a piece of wood glued between them to separate them and sits on the back wall of the Cenacle.  The reverse side is painted like the altar of our parish church or a photograph can be glued there of your parish altar.  It is supposed to represent an early church sanctuary.

Now I'd like to address the figures you see in these photos below of Jesus and the Apostles.  I made them with "Sculpy" clay which I bought at Walmart.  After you form your pieces, they will need to be baked at 275 degrees for 3/4ths of an hour for 3/4ths of an inch.  So that is 15 minutes for every 1/4 inch of thickness.  Then you let them cool down before painting.

The benefits of making them yourself is that it doesn't cost that much.   To buy each figure online is very very expensive.  Go online and price them to see for yourself.   Believe me, it's worth trying.  I tried to fashion mine after these online pieces.  I downloaded photographs of them.  I made a lot of mistakes and improved with the practice and keep finding better ways to do it always wanting to improve.  I used a water base Acrylic Stain.  I tried to stay with brown earth tones.  These paints I bought at a ceramic store and had a large collection of them from doing ceramics over the years.  However, you can get Acrylic paints at Walmart, online or at most hardware stores.


One mistake I'd like to point out.

I lined the drawers with a soft felt and then sprayed a matt finish over all the figures to protect the paint.  Although this makes the colors much richer, I would suggest not doing this because the figures became sticky from the heat during the summer.  The felt started adhering to the figures and the oil from the children's hands began smudging them as well.  So I would suggest not spraying.

The benefit of these baked figures, however, is that they can be dropped on a hard surface floor and will not break or chip.  They are tougher than resin figures and less expensive.

Steps in making the figures:  It takes me a few days to make three figures.  I usually do three at a time.  First I make the basic figure which is a a head with a body.  I shape the face.  Then separately I make the arms, nose, beard, head pieces and outer garments which I then add to the figures smoothing each one of them onto the main body.  After the nose is added and smoothed onto the face, I take a curved, pointed instrument I bought at a ceramic shop to make the eyes and mouth.  It's called a cleanup tool and it's an indispensable tool to use for this project.  You can probably buy one at Michaels if you don't have a ceramic store near you.  I also draw lines in the beards with this tool to give them texture as well as some of the outer garments.  I paint the larger areas first and set them aside to dry.  The next day I paint the faces.  It may take me a third day if my finger prints have smeared the paint.  Usually last minute touch ups are necessary. 
I learned from the first figures I made that I was not good at making eyes.  So you can see that I  simplfied this problem by having the eyes closed or half closed in prayer.

Also, this job could have been much simpler had I not painted the clothing different colors.  I could have used one color in different shades and perhaps added sand to the paint to give it texture.  That's something I haven't tried yet, but I'm planning to make that my next experiment in painting them.


 I really had problems making the noses at first.   Then I discovered that if I form a small ball of clay,  then place it on the face, smoothing it out in all directions, I could then shape it anyway I wanted.  So have fun with it.

The children love the Cenacle.  I would say that it is their favorite material.  This material really helps them with their understanding of the Last Supper and the Passion.  It is well worth the time spent making it.
These figures were by far my favorite to make.  They look like little monks.  I'd never done anything like this before and so I guess the old adage is true, "You don't know until you've tried it."

Wednesday, November 23, 2011

The Visitation, Adoration of the Magi

     The Visitation house is shown here with a courtyard and room separated by a door.   I've also seen it as just one room with a door.  It can be very simple.
The same principles apply as the Annunciation house for building with liquid nails and using paint mixed with dirt for the stucco look.  I painted the courtyard brown and glued rocks outside as well as ivy I found at Walmart.


The rug you see here is simply a piece of burlap and I've frayed the edges.


     Here is Elizabeth with child and Mary in her traveling outfit.  These were the first figures I made in 2006 and I scrubbed these with the fingernail brush and soap, then touched them up with some paint.  They look like new again.  At that time I could not bring myself to make the Blessed Mother's face.  I knew that no matter what I did, I wouldn't be satisfied.  So I didn't make her a nose; I drew it on.  Later, in the  Presentation in the Temple, I did make her nose and face, etching in the eyes and mouth with a ceramic cleaning tool that has a sharp edge.
     In the house for the Adoration of the Magi there is one room with a side entrance.   The resin figures were Christmas ornaments I found and the small containers are pill boxes.  Each pill box is filled with something to resemble the gifts.  For example, I glued tiny rocks in one and painted them gold.  These little details help the children to think more deeply about what is taking place.

Monday, November 21, 2011

Making materials for Level I Catechesis of the Good Shepherd (CGS) The Annunciation

Welcome!  This blog is for the beginning catechist who has no materials and needs an easy way to make simple but beautiful creations for the children.  It is mostly for the person who doesn't think they have any skills or inclinations in this area.  These are tips and recommendations that I hope will be helpful.  The following are Level I materials for 3 to 6 year olds.

Simplicity is the key.  I tend to get very detailed, but that really isn't necessary.  We must remember that the whole point of these materials is so the child can begin to meditate and contemplate the beauty of the Scripture they have just been presented.

The following are materials you will need to make the houses for the Nativity narratives.  As I was wandering around ACE Hardware today, I came across already cut pieces approximately 10 inches high and wide, perfect for the walls of the small houses for the Nativity narratives.  Some were smaller than others.  So you would have to decide exactly the size you would want.  You would want it to be smaller in width than the bookcase where they will be kept.  At ACE or most hardware stores, someone will cut even a large piece of wood into any size you want.  So if you are afraid of using an electric saw, this is the perfect option for you.  I would also recommend "Liquid Nails" in a tube.   This is the strongest glue I have ever encountered.  In fact I've used it for a coat rack on the back of a closet door, hanging many heavy items.  It is tough.  This is for those people who do not like to hammer nails.  Plus, you never know when the nail might split the wood.

So you lay your floor and glue your walls around it.  I have always used photographs for models that I took during my training in Gilbert, AZ.  Can you guess who my trainer was?  You've got it.  Our own dear Director, Mary Mirrione.  Our atriums are located at St. Andrew the Apostle Catholic Church in Sierra Vista, AZ.

Now to paint the outside and inside of the houses, I used Latex white paint and I put sand in it and mixed it.  This gave the little houses a rustic stucco look.   Now remember, I said I'm big on detail, but so much of this is not necessary.  You can see there are windows.  They make good handles for the children.  This can be cut out by using a drill to make the hole.  You'd need a big "bit" to do this.  Anyone at a hardware store can help you to find this.  Then get a very small hand saw and shape it.  You can sand it to smooth it out before painting.  If you like the look of the sloped sides of the house,
they were done with a jig saw.  I drew the shape I
wanted in pencil before I did that.  But again, they
can be square which is so much easier.   I put a little piece of wood in the corner for a fireplace and painted it.  Then I glued twigs next to the fire.  With a small piece of wood, I made a little shelf with liquid nails.  Oh, and I glued a twig under an old board I found in my yard so the roof would look very old and rustic.

The rug is a coaster.  The miniatures I bought online.  Google "miniature furniture."  Oh, it's fun what you can find out in cyberspace.  The world is your oyster.  I made the little pillow and mattress on the sewing machine, but again these extras are not necessary.  The Blessed Mother statue I bought at a ceramic shop, painted it and had it baked at that shop.  The angel was on sale after Christmas.  So the figures don't really have to match except that I would suggest they are of the same size in height and width.  She was the smallest statue of Mary I could get to match the angel's size.

Well, I hope this helps with getting started on the Nativity Narratives and encourages those who think it can't be done easily.  It's time consuming but is joyful work.  You are meditating the entire time you work on it.  It's wonderful!  I can't think of a better way to spend my time, can you?